Peanut Butter Chocolate Tarts

This past weekend, the boyfriend and I decided to hit up a vegan potluck in Toronto. At a loss for what to make, I was originally going to make some spinach (vegan) cheese phyllo triangles. Unfortunately I didn’t plan far enough ahead (I’m a bit off of my kitchen game lately it seems), and discovered that I wouldn’t have enough time to make these little guys because I’d have to let the pastry thaw for at least 5-6 hours. I’ve worked with this stuff many times before, and the best way to work with it without the sheets ripping is to do the thaw properly, and not use a microwave (or oven) to attempt a quick thaw.

So in the middle of the grocery store in panic mode, I decided to make something else. Thinking of some simple and quick desserts I’ve made in the past, I settled on throwing together some chocolate peanut butter tarts. One more thing – pie tart shells… Were they vegan? I look at the puff pastry – it had butter… Damn. I broke out in a sweat, hoping I wouldn’t have to Betty Crocker the tart shells due to buttery ingredients… I checked the tart shells, and score! They used vegetable based oils in the ingredients instead of butter. Happy Nikki.

So I tossed a package of shells in my basket, grabbed some more key ingredients, and went home to get started.

Oh, you may want to know what ingredients I used in these… So here you go! These are super simple to put together, and look really cute!

Peanut Butter Chocolate Tarts

Ingredients:

  • 15 mini pie tart shells

Peanut Butter Mousse

  • ½ cup silken tofu
  • ½ cup creamy peanut butter
  • 2-3 tbsp maple flavoured agave nectar (can sub. any liquid sweetener you like here, and this is purely to taste)
  • 1 tsp cinnamon
  • Pinch of freshly grated nutmeg

Chocolate Base

  • 3 squares unsweetened dark chocolate if using Baker’s chocolate. Otherwise, about ½ cup chopped dark chocolate of your choice
  • 2 tbsp agave nectar

Garnish

  • Slivered almonds

Method:

  • Bake the pie tart shells according to the package directions, and set aside to cool
  • Mix all ingredients for the peanut butter mousse in a food processor, and mix until combined. Allow to cool in the fridge while preparing the chocolate.
  • In a saucepan, melt the chocolate with the agave nectar. Once the chocolate is melted, spoon about 1 tsp of chocolate into each shell, and allow to cool for a few minutes.
  • Take the peanut butter mousse out of the fridge, and put about 1 tbsp of mousse in each shell.
  • Garnish with slivered almonds.
  • Eat, and enjoy! 🙂
Pre-moussing!

Pre-moussing!


Moussed and garnished!

Moussed and garnished!

Ready to serve! :)

Ready to serve! 🙂


Vegan Peanut Butter Mousse

Hey everyone! It’s been a while since I’ve updated because I’ve been putting a lot of focus on my class project blog, so here’s a little something sweet to make up for it! Check out Accack of the Vegan’s Blog for an AMAZING peanut butter mousse recipe!

I’m not going to re-post the recipe, so you’ll have to give her blog a look-see to find it. 😉 My alterations to the recipe were that I used coconut sugar in place of regular sugar, silken tofu in place of hard tofu + soy milk, and I used agave nectar in place of molasses.

Here’s a picture of my serving of this delightful mousse! I highly suggest you give it a try…

YUM! Peanut butter mousse!

YUM! Peanut butter mousse!

Vegan Ice “Cream”

I posted an entry in my other blog “Vegan Fitness With Nikki” for some awesome vegan ice “cream”, so if you’re looking for a tasty alternative to dairy ice cream to try at home, check it out! 🙂

There’s two flavours:

  1. Coconut Banana Cream Pie (made with coconut milk)
  2. Chocolate Strawberry (made with cashew milk)

Vegan Coconut-Carob Bars – No-Bake!

I’m proud of myself for cutting out meat properly this time around. I haven’t even eaten fish, dairy products, or eggs, which is a big step for me. Last time I was vegetarian, I still ingested those three things. This time around, I don’t have anyone pushing meat or animal products in my face on a daily basis, so I’ve found it a lot easier to make it through the first couple of weeks of being a vegetarian. (Brief history: I was a vegetarian for a few years, was with a big meat-eater, so it didn’t last long… Tried again, but went back to eating meat after 7 or 8 months.) (And for those of you who always ask, yes – you CAN get enough protein being a vegetarian. No, you don’t need to drink milk and eat meat. I can’t drink milk anyways…More on this coming up in a new “blog project” soon…)

One of my favourite sweet things to eat is carob. In powder form, solid form, whatever. It tastes awesome, and you don’t have to add any sugar to it! Oh, did I mention I’m also not really eating sugar? Some foods I eat have sugar in it, but not a lot… I haven’t opened up a bag/jar of sugar (white or brown) for a month, maybe longer. I was using honey, but then decided to give agave nectar a try. What a good decision! That stuff tastes great.

Anyways, here’s a recipe that I put together to satisfy that sweet tooth that pops up screaming for chocolate every once in a while! I’ve made this a few times now, one of the times being for a presentation in front of a group for a health and wellness class. The response was great, everyone loved them! 🙂 There wasn’t a single one left, which was awesome, because that means a few people had more than one…

I did a print out with the recipe for people, so instead of writing out the recipe here, I’ll just post a picture of the recipe. It’s so simple, anyone can do it! If you decide to make this, and have ANY questions or are confused, ask away! 🙂 Hope you enjoy! 🙂

Note: mix all ingredients together in a food processor!

Note: mix all ingredients together in a food processor!


Mmmmm....

Mmmmm....

Late Night Snack Vlog – Easy Apple “Crumble”

Here’s a random vlog! I was hungry, and didn’t know what to make… So put together an apple “crumble”. It’s not quite a crumble in the traditional sense, but my goodness is it ever tasty! This video is MUCH shorter than my last one, and I go through the few ingredients of this tasty little dish slow enough for you to write it down if you need to, so I’m going to keep this a text-light entry! Here’s you go, enjoy! 🙂

Here’s the link to my original apple crumble recipe!

Here’s some pictures!

In the oven!

In the oven!


Mmmmmmm! :)

Mmmmmmm! 🙂

Peanut Butter & Carob Chip Cookies

So, there’s a thing. Here’s the thing: I work part-time in a grocery store. I actually love working there, because I have some pretty awesome co-workers AND I’m surrounded by food. A majority of the customers are great, too. Half of the customers are people who I end up having some really interesting conversations with about food, and I’d have to say that that’s probably one of my favourite things about working there…

With all the greatness that comes with enjoying a part-time job, there is one downfall… Some customers buy really, really tasty and tempting bad foods. I lose count of how many people buy packs of cookies. On one day a few weeks ago, it seemed that every customer that came through the check-out had peanut butter cookies. Then, one customer who didn’t have cookies was buying all of the ingredients to make peanut butter cookies. I couldn’t take it anymore! After my shift was over, I rushed home to make some myself! Though I skipped on some of the more common ingredients, and made a healthy little alternative! Chocolate also happens to be a big weakness of mine, but I’ve gotten really into carob as a replacement for chocolate. (I still eat chocolate…)

Anyways, that’s the end of my story… So here’s a tasty, soft, and chewy twist on a basic peanut butter cookie! Enjoy! I sure did… 🙂

Peanut Butter & Carob Chip Cookies

Ingredients:

  • 1/2 cup whole wheat flour
  • 1/2 tsp baking powder
  • 3/4 cup peanut butter
  • pinch of salt
  • 2 egg whites
  • 1/4 cup turbinado sugar (you can replace this with whatever type of sugar you have on hand, however I really enjoy the flavour of turbinado sugar)
  • 1/4 cup honey
  • 1 tsp cinnamon
  • 1/2 cup carob chips

Method:

  • Pre heat your oven to 350.
  • Line a baking sheet with parchment paper or a silicon baking mat, and set aside.
  • Add all dry ingredients into a bowl.
  • Add all wet ingredients to the dry ingredients.
  • Mix all until combined.
  • Spoon out about 2 tbsp of dough per cookies on the baking sheet. Press together with your fingers if it starts to fall apart.
  • Flatten the tops slightly with a fork, keeping the cookies about 3/4 of an inch thick.
  • If you like, sprinkle with a little more turbinado sugar.
  • Bake for 15-20 minutes, until the edges are LIGHTLY browned. Don’t bake for longer than 20 minutes, otherwise they will dry out.
  • Remove from the oven and allow to cool.
  • Eat, and enjoy! 🙂

    So good... You need to taste these! :D

    So good... You need to taste these! 😀

Lemon Meringue Pie Minis with a Macaroon Crust

I’ve made these a few times now, and have enjoyed them each time. As the title says, these are mini lemon meringue pies with a macaroon crust. I find that the light taste of coconut really compliments the lemon curd used in this recipe.

For these little guys, I`ve found a way to make them just a bit healthier than the traditional lemon meringue pie. Taking away the traditional pie crust and replacing it with a tasty macaroon crust, removing egg yolks from the lemon curd recipe and increasing the amount of flavour with a few tweaks, and decreasing the amount of sugar in everything, allowed me to turn this into a dessert that`s a bit friendlier to those trying to eat healthy. Although, all treats should be enjoyed in moderation… But with these, it`s okay to have more than one… 😉

This recipe makes 8 minis. Enjoy! 🙂

Lemon Meringue Pie Minis with a Macaroon Crust

Macaroon Crust Cups Ingredients:

  • 1 cup unsweetened coconut flakes (fine is best, but you can use larger flakes too)
  • 1/4 cup sugar (I like to use turbinado sugar for this)
  • 3 tbsp whole wheat flour
  • 1 tsp vanilla extract
  • 1 egg white

Lemon Curd Ingredients:

  • 1 cup fine white sugar (I usually try to avoid white sugar, but it just works really well for lemon curd…)
  • 1/4 cup cornstarch
  • 1 1/2 cups cold water
  • 2 tbsp corn starch (this is being used in place of the egg yolk)
  • grated rind from 1 large lemon
  • juice from 1 large lemon (about 1/4 cup)
  • 1 tbsp butter (again, I try to avoid butter at all costs… However, it gives the curd a bit of a creamy texture just by adding in the smallest amount. You can omit the butter if you wish!)
  • 1/8 tsp orange extract
  • 1/2 tsp vanilla extract

Meringue Ingredients:

  • 3 egg whites (room temperature)
  • 1/2 tsp vanilla
  • 1/4 tsp cream of tartar (you may need a pinch more if you have troubles getting your meringue to stiff peaks!)
  • 4-5 tbsp fine white sugar (less or more, judge by your own taste! Try to keep it under 6 tbsp though, otherwise you may have trouble with the egg whites…)

Method:

  • Pre heat the oven to 350.
  • ***Make the macaroon crust cups:
  • Mix all macaroon ingredients in a bowl.
  • Divide the mixture evenly into 8 paper muffin cups (about 2 tbsp per cup)
  • Dip your thumbs in a bit of water, and press the mixture into the bottoms of the muffin cups, and a half way up the sides. Make sure the mixture is smooth.
  • Once you’ve done this with all of the cups, bake in the oven for 15 minutes. The edges should be golden brown.
  • Note: check the cups half way through. If they start to puff up in the middles, you will need to use a wet spoon to press the middles down.
  • Once done, remove from the oven, and set aside to cool while you make the lemon curd. Keep the oven on.
  • ***Make the lemon curd:
  • In a sauce pan, combine the 1 cup of sugar with the 1/4 cup of corn starch.
  • Set the sauce pan over medium heat, and slowly add the water while whisking until everything is smooth and combined.
  • Whisk in the 2 tbsp of corn starch.
  • Continue to whisk over medium heat until the mixture comes to a boil. This may take 10-15 minutes. Just keep whisking!
  • Once you’ve reached a boil, continue to whisk and boil for about 1 minute. If you stop whisking, the mixture will burn. Once the mixture has become thick, you can remove it from the heat.
  • Add in the rest of the lemon curd ingredients, and stir until combined.
  • Spoon the lemon curd into the macaroon crust cups. (About 2 tbsp per cup. You will have curd left over, so if you like you can put it in a glass jar once it cools and use it for another recipe!)
  • Set the filled cups aside in the fridge to cool while you make the meringue.
  • ***Make the meringue:
  • Put the egg whites into a clean bowl that has not come into contact with anything greasy. Grease/fat is an enemy of whipping egg whites into meringue.
  • Add the cream of tartar and vanilla extract, and using a hand mixer on a medium-high speed, whisk the egg whites to soft peaks. When pulling the whisk away from the egg whites, soft peaks will pretty much look like a bird’s beak at first, but then the egg white falls back into itself. The egg whites won’t hold their shape fully, and won’t be that glossy. I also talk a bit more about meringue here, so check it out if you like!
  • Once the egg whites are at the soft peak stage, you can slowly add the sugar while whisking. Set the speed on the mixer to high now.
  • Continue to whisk until the egg whites are at stiff peaks. When pulling the whisk away from the egg whites, stiff peaks will maintain that “bird beak” shape. Also, when you hold the bowl upside down, the egg whites will stay where they are. (Although, you may not want to use that as a method to test what stage the egg whites are at…)
  • ***Prepare the cups for baking:
  • Once the egg whites are at the stiff peak stage, remove the filled macaroon crust cups from the fridge, and top each cup with 2-3 tbsp of the meringue. What you want is a nice puffy “cloud” of meringue on top of each cup. Using a spoon, you can spread the meringue on each cup to make sure the meringue covers the whole top of each cup.
  • Sprinkle the tops of each cup with some flaked coconut, and bake in the middle rack of the oven (which is still at 350) for 10-15 minutes.
  • When they are done, the meringue will be lightly browned at the edges, the coconut flakes will be lightly browned, and when you touch the meringue it won’t stick to your finger.
  • Allow to cool completely before eating.
  • These can be stored in the fridge over night, but should be eaten within 2 days.

    Finished product! :) Mmmmm...

    Finished product! 🙂 Mmmmm...


Home made lemon curd :)

Home made lemon curd 🙂

Clean Chocolate-Coconut Oatmeal Cookies

I haven’t had as much time as I’d like to be updating this blog, but I”ll have more to post soon! 🙂 For now, this is going to be an entry that’s short and sweet, just like these cookies! If you’re into eating clean, these are the perfect little things to snack on and not compromise on nutrition. Enjoy! 🙂

Clean Chocolate-Coconut Oatmeal Cookies

Ingredients:

  • 1/2 cup rolled oats (quick cooking)
  • 1 scoop chocolate protein powder
  • 1 scoop carob powder (you can use cocoa powder if you like, but carob powder is naturally sweeter! So no need to add any extra sugar… 😉 This scoop should be the same size as the scoop of protein powder.)
  • 2 tbsp almond butter
  • 1/2 tsp baking powder
  • 1/4 tsp cinnamon
  • 2 egg whites (or egg replacer)
  • 1/2 cup shredded coconut

Method:

  • Pre heat oven to 350.
  • Prepare a baking sheet with parchment paper or a baking mat.
  • Mix all ingredients together in a bowl.
  • Roll into 12 balls, and place each ball on the prepared baking sheet.
  • Press your thumb lightly into each ball, but keep the cookies thick!
  • Bake for 10-14 minutes.
  • Remove from oven, allow to cool for a few minutes, and enjoy minus the guilt! 🙂

    mmmmm

    mmmmm


Strawberry Banana Parfait Smoothie

One of my favourite things about smoothies is that you can make them taste like dessert. Orange creamsicle smoothies, banana cream pie smoothies, pumpkin pie smoothies, and the list really can go on and on and on… They’re so versatile. As with alcoholic shots/drinks, you can also make the smoothie in layers so that it’s more pleasing to the eye… Today I decided to play around with my smoothie, and came up with a parfait smoothie! The version I made today is a bit of an “adult smoothie”, however you can omit the alcohol all together if you want to make it more kid/non-alcohol drinker friendly. The best part is how simple it is to make!

Strawberry Banana Parfait Smoothie

Bottom Layer Ingredients:

  • 1/4 cup frozen strawberries
  • 1/4 cup pomegranate juice
  • 1/2 shot of vodka
Top Layer Ingredients:
  • 1 chopped up frozen banana
  • 1/4 cup vanilla almond milk (or milk of your choice)
  • 1/2 shot Galliano Smooth Vanilla
Method:
  • Blend all bottom layer ingredients together, and pour into a tall glass.
  • Blend all top layer ingredients together, and pour on top of the bottom layer.
  • Sprinkle the top with a bit of vanilla sugar, and serve with a straw or a stick to stir it all together with!
  • Begin happy hour, and enjoy! 🙂
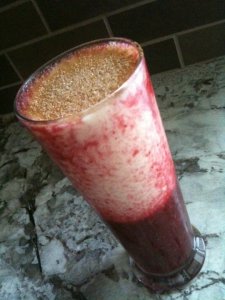
strawberry banana parfait smoothie! :)

strawberry banana parfait smoothie! 🙂

Cocoa Irish Oat Cakes

When I was trying to find a new cracker recipe on the Whole Foods app for the iPhone, I came across a recipe for Irish oat cakes. The original recipe seemed a little boring, and it used butter (which I try to avoid), so I decided to make my own version of the recipe inspired by the original. These little guys go great with some raspberry honey that I purchased from The Bee & Me tent at the Milton Farmers Market this weekend. I also used the honey in the recipe instead of just plain liquid honey.

Here’s my take on Irish Oat Cakes, with a little cocoa! 🙂 Enjoy! 🙂

Cocoa Irish Oat Cakes

Ingredients:

  • 1 cup oat flour (you can purchase this already made, or you can simply grind rolled oats in the food processor/blender until it resembles flour)
  • 1/4 cup whole wheat flour
  • 1/4 cup cocoa powder
  • 1 tbsp extra virgin olive oil
  • 1 tbsp raspberry honey (or regular liquid honey if you like)
  • 1/4 tsp salt
  • 1/4 tsp baking powder
  • 1 egg white (use two if dough is too dry)

Method:

  • Preheat your oven to 325 F.
  • Line a baking sheet with parchment paper, or a silicon baking mat, and set aside.
  • Add all ingredients into a bowl, and mix together.
  • The mixture will be quite crumbly, so once it’s all mixed together well, transfer the ball of dough to the baking sheet and roll/press it flat. It should be about 1/4 of an inch thick. If the edges are starting to crumble off, just use your fingers to press the dough back together.
  • Once the dough is flat, use a knife to make lines in the dough where you’ll want to cut it once it’s done.
  • Bake for about 25 minutes. The edges will be slightly darker (but not by much), and the dough will feel dry to the touch.
  • Remove from the oven, and use a knife to cut into each line. Set aside to cool completely before eating.

    Yummy :)

    Yummy 🙂