Strawberry Chocolate-Chip Frozen Yogurt

I feel a little strange calling this frozen yogurt, because it’s not very similar to that stuff you get at the grocery store. It’s not soft and mushy like ice cream… It’s actually closer to an Italian ice in texture, or even similar to a strawberry sorbet… Somewhat… Regardless, it’s still technically “frozen yogurt”, as there is dairy (yogurt) involved as a main ingredient. (Italian ice doesn’t have any dairy.)

This tastes pretty great, and I can imagine that in the hotter summer months ahead, it will be quite an enjoyable form of refreshment. Also, using non-fat yogurt cuts the fat almost completely! If you prefer using another liquid sweetener over honey, you can and I’m sure it will taste just as good! 🙂 Here’s the recipe, enjoy! 🙂

Strawberry Chocolate-Chip Frozen Yogurt

Ingredients:

  • 2 cups non-fat plain yogurt
  • 1-2 cups frozen strawberries (this varies depending on how much strawberry flavour you want!)
  • 2 tbsp cocoa powder
  • 2 tbsp liquid honey
  • 1 tsp vanilla extract
  • Roughly chopped dark chocolate (I used about 4 squares of a large Lindtt dark chocolate bar)

Method:

  • In a blender (or with an immersion blender), blend all ingredients except the chopped dark chocolate. Blend until smooth.
  • Stir in the chopped dark chocolate, and then pour into a couple semi-shallow plastic dishes (I used two Glad containers, about 2 inches deep)
  • Place in the freezer, and allow to harden for about 45 minutes.
  • After 45 minutes, remove the containers and stir contents until smooth.
  • Repeat this process (freezing, and removing every 45 minutes to stir) until the desired consistency is reached.
  • The frozen yogurt can be stored in these containers, or you can scoop it back into the original yogurt container. Make sure it’s covered with a lid after the whole “freeze-then-stir” process is finished.
  • Note: You can store this for many weeks in the freezer. After it’s been frozen for a day or two, it will be rock solid. Simply allow the frozen yogurt to soften slightly on the counter for 5 minutes or so prior to serving. To serve, you can also shave pieces of the frozen yogurt off of the top in layers if it doesn’t come off in one big scoop.
mmm... There it is... ;)

mmm... There it is... 😉

Daring Cooks Challenge – August 2010 – THE WORLD OF PIEROGI!

The August 2010 Daring Cooks’ Challenge was hosted by  LizG of Bits n’ Bites and Anula of Anula’s Kitchen. They chose to challenge Daring Cooks to make pierogi from scratch and an optional challenge to provide one filling that best represents their locale.

I literally put this challenge off until the last possible minute. 😉 Somehow, I’m one of those people who actually works better under pressure. 🙂 {After all, this is a challenge, right? The race against the clock was a pretty good challenge for me…} 

My first memory of a pierogi goes back to when I was 10 years old. One of my best friends in grade school, Angela, used to have me over to her house for dinner and a sleep-over many weekends throughout the year. My favourite thing about those sleep overs was the pierogi that her mom used to make. She made ones filled with potato and bacon for dinner, followed by blueberry and cream stuffed pierogi for dessert. I don’t know what it was about these doughy little puff-bubbles of flavour, but there was just something about them that I couldn’t resist! I always thought they’d be so hard to make, so I had never attempted them. Though, after making pasta from scratch, these were definitely on the list of things to do!

Here is a copy of the original recipes and methods listed on the Daring Kitchen in PDF format. You can also visit the Daring Kitchen’s website. Please refer to this for any questions regarding the whole pierogi experience if nothing I post makes any sense. 😉

For my pierogi, I decided to make them whole wheat. Reason one being that I don’t like to use white flour for ANYTHING if I can help it… Reason two being that I didn’t have anything BUT whole wheat flour, and am a little too cheap to go out and buy flour that I will only use once. 😉 So instead of yapping away, I’ll get to the recipe I did for both the dough {I didn’t do the recipe as posted, but the one I put together turned out SOOOOOO tasty! Yay! 🙂 } and the filling. I decided to go for a sweet dish, which can be used either for dessert or breakfast. So for this post, I will be posting about my specific experience with this challenge. As mentioned above, visit The Daring Kitchen for the original recipes. I really enjoyed this challenge, because we were given full creativity when it came to the pierogi dough and fillings. The only thing we HAD to do was make both the dough and the filling from scratch. What a great challenge! 🙂 I will definitely make these again, and with other flavours! Enjoy! 🙂

Peanut Butter Whole Wheat Pierogi with Maple Peanut Butter Sauce

Ingredients:

  • Dough: 1/2 cup whole wheat flour
  • 1/4 tsp vanilla sugar
  • 1 egg white
  • about 1/3 cup warm water
  • pinch of salt
  • Filling: 2 tbsp graham cracker crumbs
  • 1 1/2 tbsp brown sugar
  • 1 tbsp smooth natural peanut butter
  • 1 tbsp dried cranberries
  • 1 tbsp peanut butter chips
  • 2 tbsp mini semi sweet chocolate chips {you can omit the peanut butter and chocolate chips to keep it healthy… 😉 }
  • 2 tbsp plain non-fat yogurt
  • 1/2 tsp cinnamon

Method:

  • For the filling: mix all ingredients in a bowl, and set aside. {Yeah, it’s simple. 🙂 }
  • For the dough: place the flour into a bowl, and create a well in the middle.
  • Pour the salt, vanilla sugar, egg and water in the middle. Stir until mixed.
  • Add a bit more water if the dough is too dry, or add a bit more flour of the dough is too sticky.
  • At this point, knead the dough a bit on a lightly floured surface, or keep kneading it in the bowl.
  • Cover the bowl with a towel, and allow to rest for about 20 minutes.
  • Remove the dough from the bowl, and roll out onto a flat, lightly floured surface.
  • Roll it out to about 2 mm thickness.
  • Take a glass or a cookie cutter about 1 1/2 to 2 inches in diameter, and cut circles out of the dough. Take the scraps, and roll them out to cut more circles.
  • Place the circles on the flat surface, and fill each one with about 1/2 tsp of the filling. Make sure the filling is RIGHT in the middle.
  • Here’s the messy part: Pressing the pierogi closed. I wish I could explain it better, but I can’t. If you don’t have a press for it, because I sure don’t, then you have to do it by hand… I made a few mistakes, but that’s alright… Just fold the dough over carefully, and squeeze the outside edges together, but not too hard or you’ll rip the dough. Make sure you don’t get any filling sticking out of the sides, and if you do… Well, wipe it off. There’s a good chance the edges won’t stick together if there’s filling oozing out, though I didn’t have any problems with filling bursting out while cooking. 🙂
  • Once all of the pierogi are stuffed and pressed closed, set them aside.
  • Fill a pot half way with water, sprinkle some salt into the water, and bring to a boil on high heat.
  • Once the water is boiling, drop the pierogi in. {Only do a few at a time, I did this batch in quarters.} Make sure none of the pierogi are over-lapping each other.
  • Allow the water to return to a boil, and then reduce to medium heat. Let them simmer until all of the pierogi have started floating at the top of the water. Once they’re all floating, set a timer for 5 minutes.
  • Once the 5 minutes is up, use a slotted spoon to remove the pierogi and put them on a plate. {You may want to line the plate with paper towel…}
  • Repeat this boil method until all of the pierogi are done.
  • Now you can eat them, served with whatever topping you like! OR:
  • Get a frying pan. Drizzle a SMALL AMOUNT {say, 1/2 tsp} of extra virgin olive oil, and set the heat to medium.
  • Place the first set of pierogi on the pan, and fry for a couple of minutes on each side. The time will depend on the texture you want. If you want them a bit crispy, keep them on longer, but just make sure you don’t burn them!
  • Set the cooked ones on a plate, and eat them served with whatever topping you like! 🙂
  • Freezing the pierogi: If you want to make a massive batch and freeze them for a later date, you can! After the boiling is finished, set the pierogi aside on a paper towel lined plate. Allow them to cool completely. Place a sheet of parchment paper on a cookie sheet, and place the pierogi on the sheet. Put the sheet in the freezer, and allow them to freeze for about 30 minutes. Once hard and cold, move the pierogi into a freezer bag. To prepare again, simply bring a pot of water to a boil, and prepare the frozen pierogi as you would the fresh ones. You can then fry them if you like.

Peanut Butter Maple Sauce for the Pierogi

Ingredients:

  • Left over filling for the pierogi
  • As much maple syrup as you like

Method:

  • This is a tough one folks. I hope you’re ready…
  • Add some maple syrup to the bowl of pierogi filling, and stir.
  • Drizzle over the cooked pierogi.
  • Ta-Da! You’re  now ready to eat your sweet little pierogi.

Here’s some visuals! 🙂

ready to roll! ;)

ready to roll! 😉

pretty circles...

pretty circles...

about to be boiled!

about to be boiled!

time to dig in! ;)

time to dig in! 😉

yum yum yum yum....

yum yum yum yum....

they don't last that long after the first taste... Good thing I froze some for the husband to have tomorrow! ;)

they don't last that long after the first taste... Good thing I froze some for the husband to have tomorrow! 😉

...almost gone... ;)

...almost gone... 😉

Baked Mini “Donuts”

Timbits from Tim Hortons… Tiny Tom Donuts… Krispy Kreme… The sugar donuts you can get from the grocery store… Oh, those are all good, aren’t they? Yeah…

Unfortunately, they’re also SUPER bad for you. Have you looked at the calories and fat content of these tasty little things? Just horrible… So when looking in one of my baking cook books (1500 Best Bars, Cookies, Muffins, Cakes & More by Esther Brody), I found a recipe that appealed to the side of me that wanted donuts… Rather than make the recipe as is in the book, I worked with the general idea, changed a bunch of things, and here is what I came up with! Here is my tasty little spiced “donut”, no deep frying required! They don’t taste exactly like donuts, but they’re close enough for me! Enjoy! 🙂 This recipe makes 12 mini muffins.

Baked Mini “Donuts”

Ingredients:

  • 1 1/2 tbsp unsalted butter, melted
  • 3 tbsp brown sugar
  • 1 egg white
  • 1/2 cup + 2 tbsp whole wheat flour
  • 1 tsp baking powder
  • pinch of salt
  • 1/8 tsp each ground nutmeg and cinnamon
  • 2 tbsp vanilla almond milk
  • Coating: 1-2 tbsp each icing/powdered sugar and ground cinnamon, mixed together in a small bowl and set aside.

Method:

  • Pre heat your oven to 375 F.
  • Line a mini muffin pan (for 12 mini muffins) with paper muffin cups.
  • In a bowl, mix the butter and sugar until smooth.
  • Add the egg white, and stir.
  • Add the vanilla almond milk, and stir.
  • Add the rest of the ingredients, and stir just until mixed.
  • Spoon about 12 tbsp of the batter/dough into each mini muffin cup. (Filled to just below the top!)
  • Flatten the batter with the back of the spoon, and bake in the middle of the oven for 12-15 minutes. (Toothpick or knife inserted into the center will come out clean, and the tops will no longer be sticky. Careful not to over bake!
  • Remove from the oven, and take the first mini muffin out of the tin (careful, it’s hot!).
  • Remove the paper cup, and roll the mini muffin in the sugar-cinnamon mixture.
  • Set aside on a plate, and repeat with each muffin. (This step needs to be done while the muffins are still warm.)
  • Enjoy on their own, or with a cup of your favorite donut-dipping beverage! 🙂

Daring Baker Challenge – July 2010 – Swiss Swirl Ice Cream Cake

The July 2010 Daring Bakers’ challenge was hosted by Sunita of Sunita’s world – life and food. Sunita challenged everyone to make an ice-cream filled Swiss roll that’s then used to make a bombe with hot fudge. Her recipe is based on an ice cream cake recipe from Taste of Home.

Mmmm… Who doesn’t love ice cream and cake? This challenge was quite “challenging” in the way of assembly, at least for me… Making the ice cream was simple enough, as I’ve done sorbet before. Making the cake was pretty basic, too. The idea of combing the two was something I hadn’t thought of doing in the past, and I learned the hard way that you really do need to work fast with ice cream… 😉

For this challenge, I put together an alteration of the cake recipe along with a spin on the original ice cream flavors. I really love chocolate and coffee {I know, I know… Tell you something you DON’T know! 😉 } so I wanted to throw that into the mix. I had actually been going through a bit of Starbucks withdrawal, so I was motivated by cravings of sweet flavored coffee… I decided to name this dessert “Maple Mocha Latte Ice Cream Cake with Spiced Swiss Roll”…

Yeah, doesn’t exactly roll off the tongue… {Hah, Swiss “roll”… “Roll” off the tongue… Funny.} But I will say, the flavours I ended up putting together tasted pretty good! So I’ll spare you all the suspense, and get to the alternate ingredients I used for this challenge! Enjoy! 🙂

(Note: I am only providing the ingredients that I used for each part of the challenge. For the original ingredient list, and the METHOD for this challenge, click here! I also cut the recipe in half, as it was just for Joe and I.)

For the Swiss Roll:

Cake Ingredients:

  • 3 eggs
  • 1/2 turbinado sugar, ground to a fine powder
  • 8 tbsp whole wheat flour
  • 1 tbsp boiling water
  • 1 tsp cinnamon
  • dash each of ground nutmeg and ground cloves

Filling Ingredients:

  • 1 cup whipping cream (35% mf)
  • 1/4 tsp vanilla sugar

For the Ice Cream:

Ice Cream 1, Mocha:

  • 1 cup whipping cream
  • 1 1/2 tbsp cocoa powder
  • 1 1/2 tsp espresso powder
  • 2 tbsp liquid honey

Ice Cream 2, Honey Maple:

  • 1 cup whipping cream
  • 2 tbsp liquid honey
  • 2 tbsp maple syrup

For the fudge sauce, I kept the recipe the same.

Method: As mentioned above, click here to view the full method for forming this dessert.

This was also a fun challenge for me because I decided to play around a bit with the plate presentation. I added some roasted coffee beans and chocolate pieces, along with a fancy little drizzle of the fudge sauce used in this recipe, and some maple syrup… I may not be some “high-tech” photographer, but it was a lot of fun to put this together. 🙂 Here’s some pictures.

So I had a bit of fun with the presentation of this challenge... ;)

So I had a bit of fun with the presentation of this challenge... 😉

The ending thoughts: We did both love this dessert… For me, anything with chocolate rocks. The only problem was that my vanilla ice cream layer melted before it set, so it kinda soaked into the Swiss rolls… So when all ice cream was added and set, and the cake was removed to serve and photograph, the rolls were pretty hard while the chocolate ice cream at the base ended up melting pretty fast… It was awkward to eat, but still tasty either way! 🙂

Peanut Butter Biscotti

Beam me a biscotti! 

{Heehee, you may not get that unless you were a fan of the show “Breaker High” that aired on YTV in the late ’90s. 😉 } 

Something about twice-baked cookies makes me really happy… I love how crunchy a good biscotti is, and that hard texture makes it the perfect food to have alongside a great cup of coffee {or other hot beverage}. It just screams “dip me in that steaming liquid!”, and doesn’t fall apart like other cookies. 

The name biscotti is derived from ‘bis’ meaning twice in Italian and ‘cotto’ meaning baked or cooked. ~Joy of Baking 


My favourite biscotti was a mocha almond one that I made about a year ago, and I haven’t made any since then. Not too sure why… So today, I decided I’d make some! One flavour of biscotti that I can’t seem to find anywhere is peanut butter. I usually see chocolate chip, lemon poppy-seed, mocha, vanilla, and a few others… But still, no peanut butter. So I tossed some peanuts and honey into the blender to make some peanut butter, and got to work on these crispy little wonders! 🙂 Here’s my recipe for a {healthier-than-most} peanut butter biscotti. This recipe makes around 16 cookies, or more if you cut them smaller. I always cut each cookie in two.  Enjoy! 🙂 

Peanut Butter Biscotti 

Ingredients

  • 1/4 cup finely chopped peanuts
  • 1/2 cup peanut butter {click here to see how to make your own! You can also use store-bought if you like.}
  • 1/2 cup brown sugar {you can substitute with a different type of sugar, or decrease/increase the amount to your own taste}
  • 2 tbsp unsalted butter, softened
  • 1 egg
  • 1/2 tsp maple extract
  • 1 cup whole wheat flour
  • 1/2 tsp baking powder
  • 1/4 tsp baking soda
  • 1/8 tsp salt

Method

  • Pre heat your oven to 350 F.
  • Line a baking sheet with parchment paper, and set aside.
  • In a large bowl, mix the butter and peanut butter.
  • Add the chopped nuts and sugar, and stir.
  • Add the egg and extract, then stir again.
  • Add the rest of the ingredients {all dry ingredients}, and stir until well combined.
  • Pick the dough up with your hands, and roll it out on the counter/cutting board. Pat it into a log about 1/2 inch thick. Place the dough onto the prepared baking sheet. {You may need to reshape the log once moved to the baking sheet.}
  • Bake for about 30 minutes until the top is no longer sticky {it will become slightly firm}, and the edges will be golden.
  • Remove from the oven, and let cool for 2 minutes
  • Using a large sharp knife, carefully cut the log into slices about 3/4 inch wide. Cut the slices on a slight diagonal line to give a prettier look. 🙂
  • Sliced and ready for the second bake!

    Sliced and ready for the second bake!


  • Give the slices a bit of breathing space, about 1 cm between each piece works well.
  • Place the baking sheet back in the oven, and bake for another 15-20 minutes. {The bottoms will be browned, and the biscotti will appear slightly dried out. Do not bake at this stage for longer than 20 minutes, or you will end up with biscotti rocks. No one likes to eat rocks… When you press your finger on the top of one, it will give in a little bit, but not much. Note: when the biscotti are cooled, they will be much harder, so do not over cook!}
  • Once done, remove the baking sheet from the oven. Take each biscotti, and allow to cool on a paper towel. {Don’t leave them on the hot baking sheet to cool.}
  • Once cool, you can dip in your beverage as is, or drizzle the biscotti with any chocolate of your choice! 🙂
  • These can be stored for about 1 week at room temperature, or frozen for a few weeks.
Mmmm... Served with coffee! :)

Mmmm... Served with coffee! 🙂

Daring Cooks Challenge – July 2010 – Nut Butters

The July 2010 Daring Cooks’ Challenge was hosted by Margie of More Please and Natashya of Living in the Kitchen with Puppies. They chose to challenge Daring Cooks to make their own nut butter from scratch, and use the nut butter in a recipe. Their sources include Better with Nut Butter by Cooking Light Magazine, Asian Noodles by Nina Simonds, and Food Network online.

The original post and recipes can be viewed here! My variation of this challenge is below, enjoy! 🙂

When I first looked at this challenge, I thought “Nut butter? Really?!? I JUST made a post about my own almond butter!” But then  I realized that I had jumped to conclusions about this challenge! The core of the challenge is not only to make your own nut butter, but to include this nut butter in a savory recipe. So that means: no peanut butter cookies. This actually IS a challenge for me, as I’ve never really been a fan of having nuts involved in savory dishes. {Unless, of course, you include pecans in a salad or something to that extent…}

I wanted to try something different from what I’d usually eat, and this definitely ended up being something I would have never made had I not joined the Daring Kitchen! Rather than use the basic nut butters provided, I decided to go for it with experimentation! I whipped… Um… Actually, I blended together a fancy little nut butter sauce! It was mentioned on the website that using a blender for tougher nuts like almonds may be a bit hard, but I’ve found quite the opposite as long as I only make 1/2 cup at a time. But either way, you can use a blender, food processor, or a mortar and pestle.

So I’ll stop rambling, and give you my recipe for a tasty sauce made from two different types of nut butters, and a savory dish to use the sauce on! This recipe makes 2-3 servings! 🙂

Pecan Peanut Sauce

Ingredients:

  • 1/4 cup pecan pieces
  • 1/4 cup peanut pieces
  • 1 tbsp brown sugar
  • About 1/2 tbsp pressed/minced fresh ginger
  • 1/2 tsp ground cinnamon
  • Dash of chili powder
  • 1 tbsp liquid honey
  • 2 tbsp warm water { +/- depending on how thin or thick you want the sauce}

Method:

  • Combine your pecan and peanut pieces in a blender {or food processor}, and make some nut butter! To avoid repetition in this blog, click here to see how I’ve made my nut butter in the past! While the mixture of nuts is still in a crumb form, add in all of the other ingredients. Continue to blend until the desired consistency is reached. It’s best to blend at 10-20 second intervals if using a blender, that way you can scrape down the sides and stir it in between blends to ensure a uniform texture.

I used this sauce on:

Egg white fried brown rice with finely chopped frozen veggies. Simply boil or steam your rice according to the package directions. Drain, and rinse with cold water to stop cooking. Set aside. In a frying pan, add egg whites {about 1 egg white per 1/2 cup cooked rice} and frozen veggies. Cook over medium heat for about 2 minutes. Then, add the rice, and continue to cook until egg is cooked and veggies are tender. Make sure you’re stirring constantly so that the rice doesn’t burn!

To serve: Place the fried rice in a bowl or on a plate, and then pour your sauce on top! Eat, and enjoy! 🙂

Dinner is served! :)

Dinner is served! 🙂

Key Lime Pear Bran Muffins

Seeing as it’s been a while since I’ve posted any recipes {plenty of cooking, just not enough free time for the laptop}, I thought I’d share a key lime creation! For me, this was one of those “try something new” moments, because I have never had key limes before. I bought a bag of them at the grocery store, and was so excited because they were so small and cute. As soon as I got home, I cut one in half and licked it. When I was shocked that it was just as sour as a regular lime, the husband looked at me with confusion and said, “what did you expect, it’s a lime!” For some reason, I had hoped that they would be sweet. *Insert sad violins here.* 😦 


Bag of {key} lime ;)

Bag of {key} lime 😉


Either way, I decided to make a muffin out of them! Because this was a new trial for me, I wanted to keep the batch small. Currently, I am wishing that I had made a full dozen, because these turned out pretty darn good! If you want to make these super sweet, something along the lines of a light coconut frosting {sprinkled with toasted coconut flakes} or would go very well with these. A glaze would make these muffins soggy, as they are SUPER moist. I’ve never been a big fan of limes, but these muffins came out with such a nice texture, and a pleasantly light lime flavour. 

This recipe makes 6 muffins. To make 12, just double the ingredients. Enjoy! 🙂 

Key Lime Pear Bran Muffins 

Ingredients: 

  • 3/4 cup whole wheat flour
  • 1/4 cup oat bran
  • 1/2 tbsp baking powder
  • 1/4 tsp salt
  • 1/4 cup brown sugar {you can substitute with any sweetener if you want to make this vegan. If using a raw sugar, add it to the wet ingredients instead so that it dissolves a bit.}
  • 1/4 cup golden liquid honey {again, if making this vegan, simply omit the honey and add an equal amount of pure maple syrup instead.}
  • 3 tbsp vanilla almond milk {you can use regular milk if you like, however I wanted to keep these dairy free, and almond milk is a wonderful substitute to regular milk!}
  • 1 egg {you can use an egg substitute such as the flaxseed substitute that I’ve mentioned in an earlier post if you don’t want to use egg.}
  • 2 tbsp unsweetened apple sauce
  • 6 key limes {for this recipe, you will need to finely grate the rind of each of these key limes, and you will also need to juice each one. They’re a little tricky to juice because they’re so small.}
  • 1 Bosc pear {peeled, seeded and finely chopped}

Method: 

  • Pre heat your oven to 400 F, and line a muffin tin with 6 paper muffin cups.
  • Mix all dry ingredients in a large bowl. {Flour, oat bran, baking powder, salt, sugar and the grated rind from the key limes.}
  • In another bowl, mix the almond milk with the honey.
  • Add the egg, and lightly whisk until combined.
  • Add all other wet ingredients to the egg mixture, except the chopped pear, and mix well.
  • Add the chopped pear, stir, and then pour into the flour mixture.
  • Fold the wet mixture in with the dry ingredients just until mixed. DO NOT OVER MIX.
  • Spoon batter into the prepared muffin cups, and fill to just under the top of the cup. They don’t rise too high, so you don’t have to worry about them overflowing.
  • Bake on the middle rack for about 20 minutes. {Oven times vary, so check at 15 minutes, then again at 20. When they’re done,the tops will no longer be soft and sticky, and a knife or toothpick inserted into the center will come out with very few somewhat moist crumbs on it.}
  • Note: Allow to cool on a rack {outside of the muffin tin} before eating. Because apple sauce makes muffins VERY moist, you need to allow them to cool so that they set properly, and don’t fall apart as soon as you take off the paper cups.
  • These can be stored at room temperature over night and eaten the next morning. If keeping longer, simply place in an airtight bag or container, and keep in the fridge for up to 5 days. You CAN freeze these for up to 3 weeks, but I don’t recommend it as they taste at their best the day after baking.


Finished Product: Key Lime Pear Bran Muffins! :) Yum! :)

Finished Product: Key Lime Pear Bran Muffins! 🙂 Yum! 🙂


Visiting Carlo’s Bake Shop {From TLC’s Cake Boss}

Just follow the yellow brick PATH… 

Okay… Maybe it’s not quite lined with yellow bricks {the PATH is actually a train that the husband and I took to get from Manhattan to Hoboken}, and Buddy isn’t the wizard {although he does work some magic with baked goods!}, but visiting the Cake Boss was easily an experience that was as awesome as the movie The Wizard of Oz. 😉 

This is not a recipe related post, but what better place to mention the food and experience from this trip than here? This Canada Day long weekend, Joe and I decided to take a drive out to New York, and stay for a few nights. Knowing that we were a mere 15 minute train ride from Hoboken, I couldn’t help but insist that we visit Cake Boss. His show is one of my favourite things to watch, and he has been the biggest inspiration to me when it comes to baking and cake decorating. {I’m hoping that with a little more practice, my “house cake” will be up to “Cake Boss” standards! 😉 }Watching his show each week causes extreme drooling, and extreme urges to bake cakes. I know we’ve got plenty of amazing bakeries here in Toronto, but something about those cannolis just called out to me. {And I will admit, the hype is WELL deserved! There are some tasty treats there, people! The chocolate covered strawberries were so yummy, but I didn’t get a picture of them… 😉 Ate them too fast.} My goal was to at least get into the bakery, but I never imagined that I would have gotten to meet Buddy himself! I had hoped though… Let me share the story with pictures… 

There is an actual street sign... Hard to miss... ;)

There is an actual street sign... Hard to miss... 😉


Another sign outside of the bakery...

Another sign outside of the bakery...


The husband and I outside of cake heaven - er, I mean Carlo's Bake Shop... ;)

The husband and I outside of cake heaven - er, I mean Carlo's Bake Shop... 😉


Some wonderful cakes in the display...

Some wonderful cakes in the display...


I actually thought this was a bag at first...

I actually thought this was a bag at first...


Hello, amazing cake!

Hello, amazing cake!


One of Buddy's sisters working at the counter, she was really nice too!The bakery was SUPER busy, as expected, and we only saw Buddy inside for a moment on the stairs. They were filming, so obviously a lot of running around was going on at the back. I saw a few other members of the cast, but wasn't quick enough with the camera...

One of Buddy's sisters working at the counter, she was really nice too!The bakery was SUPER busy, as expected, and we only saw Buddy inside for a moment on the stairs. They were filming, so obviously a lot of running around was going on at the back. I saw a few other members of the cast, but wasn't quick enough with the camera...


goodies inside... Waiting to dig into our treats while sitting across the street from the bakery!

goodies inside... Waiting to dig into our treats while sitting across the street from the bakery!


Chocolate and regular cannolis... MMMMM!!!!!!!! Joe loved the regular ones, I loved the chocolate ones... :)

Chocolate and regular cannolis... MMMMM!!!!!!!! Joe loved the regular ones, I loved the chocolate ones... 🙂


We also had red velvet cupcakes... These were the best cupcakes I have ever had in my life. No jokin', in Hoboken! ;)

We also had red velvet cupcakes... These were the best cupcakes I have ever had in my life. No jokin', in Hoboken! 😉


At my insisting, we walk by the back where the deliveries happen... And what do we see?

At my insisting, we walk by the back where the deliveries happen... And what do we see?


Filming is taking place! That guy behind the crew's arm is Buddy, loading a cake into the truck... A few other people and myself stick around, and a girl from Montreal asks if he can come back out to take a few pictures. He says he'll be out in 2 minutes...

Filming is taking place! That guy behind the crew's arm is Buddy, loading a cake into the truck... A few other people and myself stick around, and a girl from Montreal asks if he can come back out to take a few pictures. He says he'll be out in 2 minutes...


True to his word, he comes back out for some pictures! So I got to meet him, and got a picture with him! :) Easily one of the highlights of our long weekend trip to NYC {and mini-trip to Hoboken, NJ}!!! :)

True to his word, he comes back out for some pictures! So I got to meet him, and got a picture with him! 🙂 Easily one of the highlights of our long weekend trip to NYC {and mini-trip to Hoboken, NJ}!!! 🙂


I’m not normally the “ohmygoshI’msuchabigfan*crycrycry*” type of person when it comes to “famous people”, because really – they’re just people, and not all people are as special as they seem. But Buddy is not just a talented baker and cake decorator, he’s also an amazing artist. He has pretty much perfected the art of making stunning cakes. {Yes, I’ve seen Ace of Cakes, and they’re great too. But Buddy is still my favourite!} It was so great to meet him, and he’s a really friendly guy. The bakery is pretty awesome, too. It’s small, and obviously gets busy, but everyone working there seemed really nice and efficient. 

I’ve read a lot of reviews where people complain about either the crowds, or about “rude workers”, and these reviews make me laugh. EVERY store/company/restaurant will have rude employees, or nice employees that are just having a bad day. It happens. Get over it. With the crowds, it’s to be expected in a place that’s on television. It’s so close to one of the hottest tourist spots, so if people are fans they’re obviously going to go and visit. Also, there are many local customers that buy baked goods from there. {So if you want to avoid crowds, visit the bakery at 7am when it opens, and go on a weekday.} If they WEREN’T busy, I’d be a bit worried… 😉 I’ve always believed that a sign of good quality food at a restaurant or bakery is a full house. So I will stress this point: Carlo’s Bake Shop lives up to the hype. 😉Note: I also got a picture with his mum, but it didn’t turn out too well…

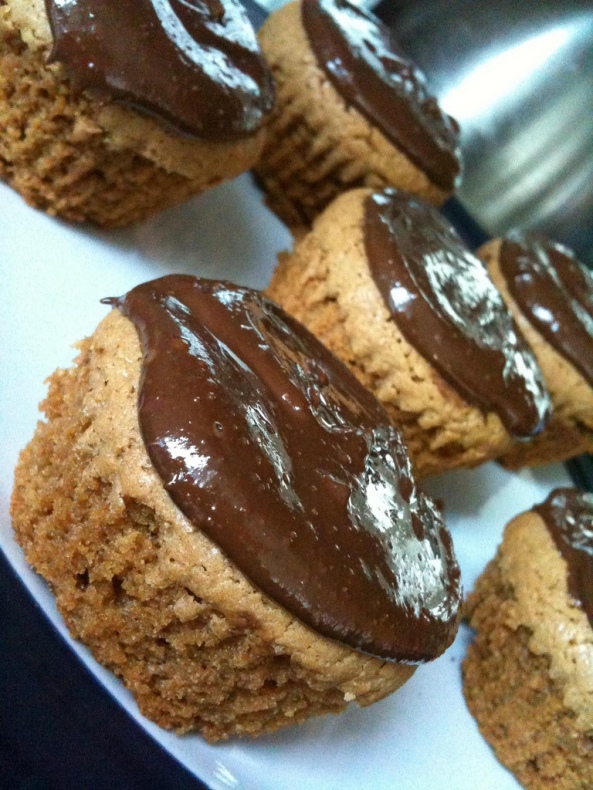
Peanut Butter Brownies with Peanut Butter & Chocolate Frosting

While looking through a massive gallery of food pictures that I had uploaded onto my laptop, I stumbled upon a few pictures of some peanut butter brownies that I had made a couple of weeks ago that I never got around to posting. {What an outrage! 😉 } Normally when I make a batch of any baked goods {cupcakes, brownies, cookies}, the last one or two won’t get eaten if it’s just for Joe and myself or I forget to bring the rest to work. {Come on, we’re not totally pigs… Sometimes 12 mini cupcakes is just TOO much to eat!} But somehow, these little guys were cleared off of the plate, crumbs and all, within the evening that they were made. {Joe really can’t resist anything with peanut butter! Yes… It was all Joe… *shifty eyes*…} So to make sure this recipe doesn’t get lost in amongst the many scraps of paper that hold my random recipes, {and to give you all a chance to try these if you wish!}, here is my recipe for some tasty peanut butter brownies with a chocolate peanut butter frosting. Enjoy! 🙂 This recipe makes 12 mini cupcake-sized brownies. {I used a mini cupcake tin with mini cupcake cups.}

Peanut Butter Brownies with Peanut Butter & Chocolate Frosting

Ingredients:

Method:

  • Pre heat the oven to 350 F.
  • Line a mini muffin pan with paper liners. Set aside.
  • In a microwave safe bowl, microwave the peanut butter and milk on high at 15 second intervals. Stir at each interval for a few seconds, and repeat this until all is melted together.
  • After it’s melted, allow to cool for a minute.
  • Add in the sugar, vanilla and eggs, and mix well.
  • Add in the flour, and mix just until combined.
  • Place about 1 tbsp of batter into each mini muffin cup. {Or however much it takes to fill up each cup just below the top.}
  • Bake for 30-40 minutes, removing from the oven once a toothpick inserted into the center comes out clean with a couple of moist crumbs attached. The tops will appear somewhat dry and shiny.
  • Remove from the muffin tin, and allow brownies to cool on a rack. Frost when cool.

Chocolate Peanut Butter Frosting

Ingredients:

  • 50 ml peanut butter
  • 2 oz chocolate

Method:

  • Melt the peanut butter and chocolate in a microwave safe bowl at 15 second intervals in the microwave on high heat, stirring at each interval. Repeat this until the chocolate is melted.
  • Spread the frosting over the brownies, and allow to set. Or, eat right away! 🙂


peanut butter brownies... *drools*

peanut butter brownies... *drools*


Green Smoothie – Success At Last!

After MANY attempts at this whole “green smoothie” business, I have finally found the way! Kale. Yes, Kale. The cousin to cabbage. Who would have thought that this leafy thing would work so well? After green smoothie attempts with baby spinach {so many websites seem to suggest this as a good starting point, though it didn’t work well for me}, and iceberg lettuce {which does NOT work… *sigh*}, I turned to the massive amount of kale I had sitting in my fridge. {I had purchased a bunch at the advice of my boss to add to some tomato sauce, which turned out tastier than I had imagined! 🙂 } I had read suggestions saying that kale would be a little bitter for a smoothie, but I actually couldn’t taste the kale at all. I used quite a bit in each smoothie, too… So here it is, a recipe for a fresh and amazing green smoothie! It looks VERY green and questionable, but believe me when I say that your taste buds and insides will be happy to have this! I even got my husband to drink this, and he’s a little reluctant to have things this healthy. 😉 He actually drank his faster than I drank mine, which is always a good sign. 🙂 Enjoy! This recipe makes 2 regular sized smoothies at just over 100 calories each, or 1 large one if you’re feeling really hungry/thirsty. 😉

Green Smoothie With Kale

Ingredients:

  • About 1 cup finely chopped fresh kale {rinse the leaves before chopping. Remove the leafy parts from the stems, then discard the stems. You want the leaves without stems. Also, try to go for the smaller leaves as they are less bitter.}
  • 1 banana, cut into pieces {I always buy bananas in large quantities, and then freeze them just before they start to turn brown. That way I can use frozen bananas in my smoothies. They make such a nice cool and creamy texture when frozen.}
  • 1/4 cup crushed pineapple {you can use canned, or fresh. If using canned, toss in a bit of the juice too!}
  • Juice of 1 medium-large orange
  • About 1 cup crushed ice
  • About 1/2 cup of water {you may need a little more.}
  • 1 tsp vanilla extract
  • 1 tsp ground cinnamon {you can also add a dash of nutmeg if you like.}

Method:

  • Just toss everything into a blender, and blend until smooth! 🙂
  • Serve and drink immediately.

Note: With a green smoothie, the green taste may be a bit too much for some people. The banana in this smoothie helps to tone down the bitterness of the greens, while the pineapple provides enough sweetness. Cinnamon and vanilla are also a great additions to any green smoothie. Green smoothies are great to cleanse the system, so when having one, be sure to avoid dairy or and fatty oils that would be found in nuts and seeds. {So don’t add yogurt, milk, or any almond/rice/soy milk to this.} Try to drink this on an empty stomach, and don’t eat for about 30 minutes after.

Green Smoothie -Drink Up! :)

Green Smoothie -Drink Up! 🙂